At first, trying to write a 3DS Homebrew app in C/C++ may seem hard, but it really isn’t! If you know a bit about programming, the basics of C++ are quite easy.
Getting Started
Tools you need
To write a C++ app for the 3DS, you need an SDK called devkitPro. Once you have installed devkitPro, you will need an IDE. I personally use CLion, but other IDEs like Visual Studio work well too.
You will also need a C/C++ compiler. CMake is what I use, but GCC is good as well. This “tutorial” will use CMake.
Once these are installed, you can move onto the next step.
Setting up CMake
CMake uses a CMakeLists.txt for toolchains1. I have made a CMakeLists.txt file for this project, but it is targeted at Linux.
cmake_minimum_required(VERSION 3.10)
project(Learning3DS CXX)

# Use devkitARM compiler
set(CMAKE_SYSTEM_NAME Generic)
set(CMAKE_SYSTEM_PROCESSOR arm)

set(DEVKITPRO "/opt/devkitpro" CACHE PATH "")
set(DEVKITARM "${DEVKITPRO}/devkitARM" CACHE PATH "")

set(CMAKE_C_COMPILER   "${DEVKITARM}/bin/arm-none-eabi-gcc")
set(CMAKE_CXX_COMPILER "${DEVKITARM}/bin/arm-none-eabi-g++")
set(CMAKE_ASM_COMPILER "${DEVKITARM}/bin/arm-none-eabi-gcc")

# 3DS specific flags
set(COMMON_FLAGS "-march=armv6k -mtune=mpcore -mfloat-abi=hard -mtp=soft")
set(CMAKE_C_FLAGS "${CMAKE_C_FLAGS} ${COMMON_FLAGS}")
set(CMAKE_CXX_FLAGS "${CMAKE_CXX_FLAGS} ${COMMON_FLAGS}")
set(CMAKE_EXE_LINKER_FLAGS "${CMAKE_EXE_LINKER_FLAGS} -specs=3dsx.specs ${COMMON_FLAGS}")

message(STATUS "DEVKITPRO = ${DEVKITPRO}")

# Include directories for headers
include_directories(
        ${DEVKITPRO}/libctru/include
)

# Add executable (ELF)
add_executable(Learning3DS.elf src/main.cpp)


# Link libraries
link_directories(
        ${DEVKITPRO}/libctru/lib
        ${DEVKITPRO}/portlibs/3ds/lib
)

target_link_libraries(Learning3DS.elf
        ${DEVKITPRO}/libctru/lib/libcitro2d.a
        ${DEVKITPRO}/libctru/lib/libcitro3d.a
        ${DEVKITPRO}/libctru/lib/libctru.a
        m
)

# Post-build command to convert ELF to 3DSX
set(3DSXTOOL "${DEVKITPRO}/tools/bin/3dsxtool")
set(SMDHTOOL "${DEVKITPRO}/tools/bin/smdhtool")

# Convert ELF to 3DSX and embed SMDH
add_custom_command(TARGET Learning3DS.elf POST_BUILD
        COMMAND ${SMDHTOOL} --create "Learning3DS" "This is the description" "Your name here" "${DEVKITPRO}/libctru/default_icon.png" ${CMAKE_CURRENT_BINARY_DIR}/Learning3DS.smdh
        COMMAND ${3DSXTOOL} $<TARGET_FILE:Learning3DS.elf> ${CMAKE_CURRENT_BINARY_DIR}/Learning3DS.3dsx --smdh=${CMAKE_CURRENT_BINARY_DIR}/Learning3DS.smdh --romfs=${CMAKE_CURRENT_SOURCE_DIR}/romfs
        COMMENT "Generating SMDH and converting ELF to 3DSX"
)
You should also have a 3ds-toolchain.cmake file. This is your toolchain.
# 3ds-toolchain.cmake
set(CMAKE_SYSTEM_NAME Generic)
set(CMAKE_SYSTEM_PROCESSOR arm)

set(DEVKITPRO /opt/devkitpro)
set(DEVKITARM ${DEVKITPRO}/devkitARM)

set(CMAKE_C_COMPILER ${DEVKITARM}/bin/arm-none-eabi-gcc)
set(CMAKE_CXX_COMPILER ${DEVKITARM}/bin/arm-none-eabi-g++)
set(CMAKE_ASM_COMPILER ${DEVKITARM}/bin/arm-none-eabi-as)

set(CMAKE_FIND_ROOT_PATH ${DEVKITPRO})
set(CMAKE_FIND_ROOT_PATH_MODE_PROGRAM NEVER)
set(CMAKE_FIND_ROOT_PATH_MODE_LIBRARY ONLY)
set(CMAKE_FIND_ROOT_PATH_MODE_INCLUDE ONLY)
Printing
Your file structure should look like the following:
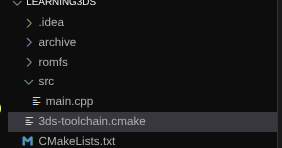
All your C++ source code should live in src, while other files for your project (images, audio, etc) live in romfs.
Create a main.cpp file in /src.
Imports in C++
To import a C/C++ header, we use #include. We need to include the devkitPro 3DS header, so we use #include<3ds.h>. We also need cstudio and cstdlib.
Your includes should look like the following:
#include <3ds.h>
#include <cstdio>   // for printf
#include <cstdlib>  // for exit, etc.
Next, we have to open our main method. To do this, we do the following:
#include <3ds.h>
#include <cstdio>   // for printf
#include <cstdlib>  // for exit, etc.

int main() {

}
The main method is where all our code runs. We need to init the screen/graphics, so we use gfxInitDefault();
Your file should look like this now:
#include <3ds.h>
#include <cstudio>
#include <cstdlib>

int main() {
    gfxInitDefault();
}
We also need to init the console, using consoleInit(GFX_Top, nullptr);. This starts the console on the top screen.
Now we need to actually print using printf("Hello, World!");Your file should look like the following:
#include <3ds.h>
#include <cstdio> // for printf
#include <cstdlib> // for exit, etc.
int main() {
// Initialize graphics on top/bottom screens
gfxInitDefault();
consoleInit(GFX_TOP, nullptr); // console output on top screen
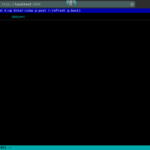
printf("why is kiki so fat\n");
}Next, we need our main loop. This waits for us to press START to return us to the Homebrew Launcher.
This is quite easy.
while (aptMainLoop()) {
        gspWaitForVBlank();
        gfxSwapBuffers();
        hidScanInput();

        // Exit if START is pressed
        u32 kDown = hidKeysDown();
        if (kDown & KEY_START) break;
    }
while runs the code in the loop while the statement in the brackets is true.
gspWaitForVBlank(); waits for the next VBlank.
gfxSwapBuffers(); swaps the buffers. It’s a good idea to use gfxFlushBuffers(); with this as well.hidScanInput(); scans input from the buttons on the console. We use this in conjunction with u32 kDown = hidKeysDown();. if (kDown & KEY_START) break; checks if the START button is pressed. If it is, end the process and return to the Homebrew launcher.
    gfxExit();
    return 0;
This is needed at the end of the while loop to close the graphics and return with exit code 0 (no errors).
Conclusion
I hope this helped you write your first 3DS Homebrew app! I will post more guides on how to do this shortly, including drawing a square, drawing a cube, roatating said cube and making a basic game.